THE LATEST
Showing posts with label Beauty. Show all posts

Beauty Buzz: How to Stop Your Eyeliner from Smudging


Lining your water line with white has become a trend after its recent appearances on the runway. While it may be trendy now, using white eye liner is a timeless trick for creating fresh-faced looks as it makes the eyes appear larger and more open.

The most problematic issue with lining the waterline is keeping the color from smudging or disappearing entirely. Below are a few tips to keep your makeup in place all day.


-Use a high quality cream-base liner. Liquid liners are not for your waterline! They will smudge quickly. A good option is something like the Urban Decay 24/7 Glide-On Eye Pencil in "Yeyo".

-Use a matching eye shadow or translucent setting powder to set your eyeliner. The powder will absorb moisture that would otherwise smudge or remove the liner making your look last longer. If using a translucent setting powder, be careful to find one that will not alter the color of the liner. Most “translucent” setting powders are actually white, so if you are trying to set brown or black eyeliner on the waterline the color will be changed with the addition of a bad setting powder to something more muted. For lining your waterline with colors other than white, a good translucent setting powder is the Laura Mercier Loose Setting Powder in "Translucent".

-Use a small flat brush or a cotton swab to pat the eye shadow or powder on. Heads up; if your powder is pricey, use a flat brush! Cotton swabs waste powder because it collects in the twists of the fine fibers, so most of your expensive powder will end up in the trash––not on your eyes.

-This process can be uncomfortable so careful not to get powder in your eye! Pulling your lid gently away from your eye can help in the beginning. Don’t make pulling on your eyes a habit because it can encourage wrinkles. Moving your lid is just for practice until you get the hang of putting a powder on your waterline.

The effort is worth it! Fallout and smudging is minimal and the powder will absorb moisture from your waterline for a look that can last all day (or night).

Go forth and color those waterlines fearlessly because you know you won’t be looking like a raccoon reject five minutes after leaving the house.

By: Leah Marie Walkiewicz | Image: Source

How to Apply Game Day Eyeliner


Game day can be a gaudy affair. Luckily, it doesn’t have to be that way. This game day eyeliner tutorial is designed so that you can show off your school spirit without the tacky temporary tattoos.

For this look, you will need:
  • white eyeliner that has a cream base
  • eye shadow in your team’s colors
  • black liquid liner
  • a small angled eyeliner brush
  • mascara.

I have used both gold and bright yellow in this look to replace the “Maize” part of “Maize and Blue.” For a more wearable feel, swap out white for silver, or gold for yellow.

Step 1: Thoroughly clean your lids and lashes. It’s always a good, hygienic idea to start with a blank slate.

Step 2: Draw a thick band on your upper lid along the lash line with the white eyeliner.

Step 3: Take a damp angled eyeliner brush and dip it into the darker of the two colors. Start at your outer corner and pat the color onto the white liner, stopping just past your pupil.

Step 4: Clean off your brush by rubbing it on a dry paper towel, dampen it again. Place the lighter second color on the inner half of the band of white eyeliner. Careful not over blend the line between the two eye shadow colors.

Step 5: Line your upper lid just above the lash line with a thin layer of black liquid eyeliner to add definition. If you choose to go past your lash line to make a cat eye, ensure that the tip of our line points up at the end of your brow line.

Step 6: Apply a thick coat of mascara, put on your game day outfit, and enjoy the game!

Image Source

10 Tips for Natural Makeup Application


Because you’re already a beauty, your philosophy is: less is more. We know not all ladies think alike, and some hate the way makeup feels, looks or smells, so we have specialized a guide for the days when you DO want to wear makeup and look effortlessly polished.

Tip #1: It’s all in the eyes and brows
We know you hate the harsh lines of black liquid liner, so opt for a brown pencil or brown matte eyeshadow. With a dark brown, you can line your top and bottom lashes. Top it off with a volumizing mascara for extra definition and an opening effect. If you find that your eyebrows get lost in your face after defining your eyes, swipe one coat of mascara on them. Trust us, it works; it is the best lazy girl tip.

Tip #2: Use neutrals
We know this is a no-brainer, but it never hurts to say it again: don’t slap on blue eyeshadow or anything bright on the first go. You will end up loathing your makeup routine and underestimating the power of makeup.

Tip #3: Don’t ignore skin care protocol
Before applying makeup, it is essential that you cleanse and moisturize your face. After washing your visage, wait two to five minutes for the moisturizer to absorb. Finally, do not make the biggest beauty sin by neglecting to remove your makeup at night. This is when it is not okay to be lazy. With great power, especially makeup power, comes great responsibility. Take it off because you don’t want a zit war to erupt overnight.

Tip #4: It’s all in the glow
Our biggest beauty pet peeve is a cake face, which is one of the biggest reasons you hate wearing makeup. If you loathe foundation and find no need for coverage, don’t put on foundation. Just forget it; you don’t need it. If you do want coverage, try a BB Cream or a tinted moisturizer, which are the most natural. To avoid cake face, only powder your T-zone. Finding the perfect base is a trial and error process. Don’t give up.

Tip #5: Concealer is optional
Just like foundation is optional, so is concealer. Instead of covering your face with a tinted moisturizer, a concealer is a better solution for hiding a few pimples and dark circles. Foundation and concealer can be interchangeable -- you pick.

Tip #6: Blush it up OR not
Blush is one of the most personal beauty items in any girl’s makeup. Your favorite blush says a lot about your personality and what complements your complexion. We recommend you try cream blushes; they don’t require much work or a brush! Use the most simple makeup tool, your fingers, to apply. Pinks and peaches work for everyone, again, no bright colors.

Tip #7: Throw out the lip gloss
As beauty aficionados, we hate to confess, some of us just don’t like lip gloss. It can feel uncomfortable, and it can be too shiny, and our hair can get stuck in it. Stick to lipsticks; if that’s also too much for you, lip butters and colored lip balms also are heavenly sent.

Tip #8: Choose quality over quantity
The best benefit about luxury beauty stores like Sephora and Nordstrom is that you can return a product after testing it. After all, you are the girl who concentrates on staples, so keep to the basics, and go for the best. This way you won’t be spending money you don’t have, and you never know, you may end up falling in love with makeup. Study your face, and test out the items you’re interested in buying. And don’t be afraid to ask the employees for recommendations as they have had training to help them find the best product for each client.

Tip #9: Google it
If you are curious about a certain product your BFF raves about it, Google it -- do your makeup research. You’d be surprise how the logistics of makeup help you to create the perfect look. Look up product reviews and makeup tutorials anytime! Check out MakeupAlley and YouTube.

Tip #10: Be you
Don’t feel pressured by society’s norms to wear makeup. As an educated woman, you know women are created equal, and you have the right to exercise your tastes and demands in what constitutes as beauty. Don’t let your boyfriend, girlfriend, family or friends sway you into believing any different. Do what you like, simple as that! Wear makeup for yourself. So your boyfriend doesn’t like your new red lipstick? Too bad, you’re wearing it for you, because it makes YOU feel good!

We promise these tips won’t have you looking cakey or unrecognizable. Practice makes perfect.

By: Ivanna Coello | Image: Source

Be Bold: Vibrant Lipsticks for Every Skin Tone


A bold lip is the perfect finishing touch to any look, whether it’s fancy or casual. Adding a pop of color is a great way to change up everyday makeup. Dark shades in particular are trendy during fall and winter.

You may feel overwhelmed while examining the hundreds of shades of lipsticks lined up at the makeup counter. It’s no easy task picking out the best shade. When picking out the right shade of lipstick for someone, makeup artists often take into consideration the person’s features, focusing mainly on the tint of the skin. Based on the tint of your skin, you can select the best lipstick shade for you and feel confident about it.

Fair Skin

For light, fair skin, the best shades of lipstick are ones with pink undertones. These include shades of berry and mauve. Try Revlon Super Lustrous Creme Lipstick in Berry Haute or L’Oreal Paris Colour Riche Lipstick in Saucy Mauve.

Medium/Yellow-Toned Skin

 
 For medium or yellow-toned skin, try shades of coral or bright reds. This is the perfect skin tone to rock a daring red lip. For a bold, reddish coral lip, try Mac’s Matte Lipstick in Lady Danger, or for a plain red lip, test out Maybelline’s Color Sensational lipcolor in Red Revival.

Olive Skin


This skin tone is very versatile with several different lip colors. Shades of bright berry and plums really pop on olive skin. For a berry-inspired lip, try Marc Jacobs’ Lovemarc Lip Gel in Seduce Me. For the perfect shade of plum, try Revlon’s Super Lustrous Lipstick in Black Cherry.

Dark Skin

Shades of red and mauve look fantastic on a dark skin tone. For a classic red lip, try NARS Lipstick in Jungle Red. Another dark shade of mauve to try is Maybelline’s Colorsensational Lip Color in Madison Mauve.

If you’re still having trouble finding the best bold lip color for you, don’t be afraid to ask for help at the makeup counter. Makeup experts can give you the assistance you need in finding your perfect shade. You’ll be sure to make a statement this season wearing a fresh and new bold lip.

By: Chrissy Tansey | Sources: 1, 2 | Image: Source

Top 5 Best Classic Makeup Combinations

Because there are so many brands, colors, designs and types to choose from, experimenting with new makeup combinations can be one of the best parts of being a girl. Still, in the end, there are a few classic and faithful combinations that I return to. Here are some of my favorite makeup combinations:


Timeless Smokey Eyes with Nude Lips
The smokey eye with nude lips combination complements almost any outfit and works well for a big night out. Because dark, smokey shadow is a strong statement, pairing it with nude lipstick instead of a bright lip will help to keep the focus on your gorgeous eyes.

Product Recommendations:

Black Eyeliner with Bright Red Lips

The classic black eyeliner and red lipstick combination is a go-to makeup look and for good reason; the sultry look radiates elegance. If you feel more daring, wing out eyeliner to make a cateye. For additional flair, wear this combination with a leopard print, white or black dress to make your lips pop.

Product Recommendations:

Baby Doll Lashes with Berry Lips

Nothing says bombshell quite like killer lashes! In order to get DIY falsies, apply baby powder in between coats of mascara, or curl your lashes both before and after mascara application. By adding a berry lip, the look transforms into a sophisticated, mature look that stills brings drama.

Product Recommendations:

Light Purple Shadow with Pale Pink Lips

This subtle combination is great for a girls day out or a trip to the mall. The focus is on the eyes, yet the gloss will complement rather than contrast. Adjust the shade of the shadow based on your skin tone. If you have lighter skin, go for a more pastel shade. If you have olive or dark skin, opt for a deeper pigment color.

Product Recommendations:

Bold, Aquamarine Eyeshadow with Coral Lips

Steal the resort look by creating an island glow, accented with bold color. Start by using a shimmery aquamarine shadow for lids that glisten like the ocean. Add a shiny coral gloss to complete your exotic paradise pucker. For a faux tan, swipe bronzer on your cheekbones, forehead, chin, neck and sides of the nose.

Product Recommendations:

Whichever look you try, know that even though it’s fun to experiment with different shades and textures, there are a few classic looks that will never fail.

By: Jen Morgan | Image: Source1, Source2

Be a Beauty Buff: Beauty Dictionary


Now that you’re done with midterms, we thought we would turn you into beauty scholars, too. It’s difficult to keep up with the slew of fancy new products each season and tutorials when you don’t recognize some of the beauty terms. No worries, because we are here to train you.

Balayage: It’s a hair coloring technique where color is applied by hand rather than foiling or using a cap. It creates light and shade throughout your hair, leaving you with a sun-kissed look. Women with all types of hair and length can try this trend, whether you want a super edgy look or a natural do.

Tip: If you have curly or wavy hair and are looking for a new do, you have found your answer. Balayage enhances the colors and the dimension of your curls, and it’s low-maintenance, since it’s not colored from the roots. You’ll have no reason to envy straight-haired girls anymore. If you’re still on the fence, check out this feature on Vogue Australia.

Cupid’s Bow: Some may say this is the sexiest part on a woman’s face, other than her eyes, of course. Your cupid’s bow is the line of the curved upper lip said to resemble Roman god Cupid’s bow.

Tip: Make your lips totally kissable by dabbing your favorite highlighter on your cupid’s bow for a plumper, sexier lip.

Dewy: Our favorite word for everything fresh and glowy. If your skin looks dewy it means it looks hydrated and glowy, of course. If you have ever watched a Victoria's Secret fashion show, you know what dewy looks like!

Tip: If you have dry skin and would like to add a glow, opt for a cream blush, highlighter or a hydrating primer, such as Laura Mercier Foundation Primer-Radiance ($19.50, Sephora).

Glycolic acid: Glycolic acid is a natural ingredient from sugar cane, and its sole purpose is to exfoliate; it's part of the AHA (Alpha Hydroxy Acid) used in cosmetics to normalize hyperkeratinization (overly thick skin). Since it is an exfoliator, it safely removes dead skin cells, revealing fresh new skin underneath. Usually glycolic acid is a popular anti-aging ingredient, but it also immensely benefits those with discoloration and acne. Goodbye acne scars and blackheads!

Tip: If getting a facial is out of the question because all your hard-earned money went to your new textbooks, give an at-home peel a try. We like Philosophy The Microdelivery Triple-Acid Brightening Peel ($69, philosophy.com).

Matte: Chances are you girlies with oily skin are too familiar with this word. A matte finish is anything without shine or glow. Think of the 90s and 50s ... everything was super matte.

Tip: For a matte finish, look for the word "matte" in foundations, eyeshadows and lipsticks. When going for a more sophisticated, classic look, opt for a matte finish. 

Parabens: Paraben is the most controversial word on this list for its remote link with breast cancer. Parabens are preservatives found in your cosmetics, and typically more than one paraben is used in formula; they are used to prevent microbial growth, such as fungus. Methylparaben, Propylparaben and Butylparaben are the most commonly used parabens, according to the FDA. There are millions of articles swaying consumers not to use parabens, when in reality there is no significant research showing that they pose a health threat.

Tip: “They have been linked distantly (meaning in limited studies and with only a handful of subjects or animal studies) to breast cancer due to their weak estrogenic activity and their presence in a tiny number of breast cancer tissue samples” says Paula’s Choice. “That cancer connection, however distant, and the media firestorm surrounding parabens, has some people worried. Regardless of what you decide about parabens, you should know that there is no research proving parabens should be avoided when you shop for personal-care products for yourself or your family.” This is your call. 

Pigmented: Eyeshadows are often referred to as pigmented, meaning they are rich in color.

Tip: If the eyeshadow is pigmented, the color will be highly intensified, signifying that you made a good purchase; but if upon application you find it chalky and have to apply multiple times for a good color payoff, return it! 

Retinol: This isn’t the biggest beauty buzz word of the century for no reason. Retinol is “the name for the entire vitamin A molecule,” says Paula’s Choice. “Retinol helps skin cells create better, healthier skin cells, provides antioxidant support and increases the amount of substances that enhance skin’s structural elements.” This is why Retinol is such a vital ingredient in anti-aging regimens as well as acne fighting ingredients. It combats acne scarring by removing dead cells and encouraging the growth of collagen, leaving you with clear skin.

Tip: Retinol is a fussy ingredient and shouldn’t be used lightly. Ask your dermatologist for advice on how to incorporate retinol-based products for clear skin. 

Sulfates: Sulfates are used in skin and hair care products as cleansing agents. Over the years they have gained a bad rep by the cosmetic industry and have been used as a scapegoat to promote other ingredients and products. As your BFF, we are here to tell you not to buy into the hype. “Those that have become the scapegoat of the cosmetic industry include sodium lauryl sulfate, ammonium lauryl sulfate and sodium laureth sulfate” says Paula’s Choice. “In reality there is absolutely no research showing they are a problem in skin-care or hair-care products other than causing irritation, but that is also true for the sulfate-free cleansing agents some cosmetic companies advertise they are using.”

Tip: Stick with that works for you. There is no research proving that sulfate-free formulas are better for your hair or skin. 

Tightline: Behold the invisible eyeliner, every beauty guru’s makeup weapon for fuller lashes. If you prefer a natural look, tightlining will do your eyes justice. To tightline, line in between the top lashes as opposed to the skin above your lashes.

Tip: Use a waterproof, black eyeliner to achieve its full effect, such as Urban Decay 24/7 Glide-On Eye Pencil in Perversion ($19, urbandecay.com). Check out this guide by “The Beauty Department”. P.S. You’re not limited to pencil. Liquid or gel are all great tools, too.

Waterline: Technically, you should learn about your waterline before tightlining, but after all, this is a dictionary. Anyway, your bottom waterline is where we usually put on eyeliner. It is above your bottom lash line. Your bottom waterline, as opposed to your upper waterline (where you tightline), is probably one of the first places you applied makeup onto in your face and the trickiest.

Tip: For the sexiest and most intense smokey eye, do not forget to line your top and bottom waterline.


Now that you’re a beauty smarty, get back to studying!

By: Ivanna Coello | Image: Source

8 Hair Products You Never Knew Existed


We know you just finished dorm room shopping and updating your wardrobe for fall, so we hate to encourage more, but we couldn’t miss this chance to educate you on one of our favorite topics: hair!

We all want beautiful, manageable, shiny locks! Whether you have a pixie long locks, we are taking an opportunity to inform you about some less-talked-about game changers.


HAIR PERFUME
Our biggest pet peeve is getting dolled up, dining out at our favorite restaurant and leaving smelling like food from head to toe! Since scent easily latches on to hair, we recommend you try a hair perfume. We are torn between the classic cotton candy goodness that is Pink Sugar Hair Perfume ($15) and Taylor Scented Hair Mist ($20) by Taylor Swift. If you are judging us for buying hair perfume, think about its many uses -- spritz onto your hairbrush in between washes, use it for special occasions or other smelly incidents like if you’ve been around cigarette smoke. This will leave you refreshed and smelling heavenly.


BRUSH CLEANER
To avoid greasy hair, it’s best to clean your hair brush at least once a week. If you shed a lot and use a lot of product, you know this is a difficult task. It almost seems impossible to wash off the lint and grime, sounds gross, but we are keeping it real. If you’re paranoid about your greasy locks, or damaging your wooden hairbrush and bristles, we suggest you invest in Olivia Garden Brush Cleaner ($12.99).


HAIR CLIPS FOR YOUR BLOWOUT
Now these aren’t any ordinary hair clips, they are hair clips tailored for the perfect blowout. If you are one of the many college goddesses who straightens her hair weekly, these are life savers, especially for those with thick, voluminous hair. We can’t get the job done without Drybar Hold Me Hair Clips ($16). We promise these four clips are enough to securely hold every strand. Plus, they make your blowouts less stressful.


CURLING LOTION FOR PILLOW TIME
It’s no secret that curly hair is hypersensitive to its environment, rain or shine. We know sleeping on silk pillowcases is far better for our hair and skin, but let’s be honest, this is a beauty practice we seldom practice. Miss Jessie’s Pillow Soft Curls ($22) works with the fabric of your pillowcase to deliver static-free, soft, big curls. “It's the first “fabric softener” type styling lotion that will leave your curls clothesline fresh and fluffy soft,” said Miss Jessie’s.


DRY CONDITIONER
We all know about a little thing called dry shampoo, the best hair invention since the flat iron, that is, until dry conditioner. We know there’s been talk, but you haven’t been properly introduced. We can’t live without Suave Dry Conditioner ($2.88). This helps us with our biggest problem post blowout: greasy roots, and dry ends. This will instantly add shine without weighing your mane down.


PRE-SHAMPOO TREATMENT
Don’t laugh at us, we are not making this up; hear us out. Michael Van Clarke, London based stylist reveals to Refinery29 that many of products in the market today are “hair makeup” instead of “hair care.” They make your hair look good for that day but do not provide the treatment it needs. “A pre-wash treatment works by adding that hydration back into the hair. Van Clarke suggests using it every other shampoo. He advises clients to add it to the hair at night -- if you apply it a couple of hours before bedtime, it will absorb into the hair completely -- and then wash it out in the morning.” We are in love with Burt’s Bees Avocado Butter Pre-Shampoo Hair Treatment ($9) for its serious hair-healthy powers.


SPF HAIR CARE
Yes, your hair needs SPF! If you are an athlete this is a must-have! If you love surfing the waves, hiking or just spending hours outdoors, this will protect your scalp and your color from fading. Try Aveda Suncare Protective Hair Veil ($32) for its 16-hour day protection.


A TOWEL ESPECIALLY FOR WAVY AND CURLY HAIR
If you have beautiful ringlets, you know how stressful it is to maintain a frizzless ‘do. Curly-haired girls face more hair issues than the rest, the biggest being, your hair doesn’t easily lock moisture, thus creating a mountain of frizz. DevaCurl DevaTowel ($12) promises to keep your curls intact, defined and frizzless!

We will not judge you for trying out more than one of these tress tempters; we know we made a strong case. After all, we are all hair hustlers, and even Rapunzel wouldn’t have resisted.

By: Ivanna Coello | Image: Source

7 Essentials for Your Nighttime Routine


Although it’s tempting to head to bed right after finishing your last assignment of the night or evening class, it’s important to take a bit of time out of your schedule to unwind and take care of yourself mentally and physically. Read on for some practices to add to your nighttime routine.

Remove Your Makeup
In order to keep your skin, eyes, lashes and lips healthy, it’s essential to remove all of your makeup at the end of the day. Use a gentle eye makeup remover to wipe off your mascara, eye shadow and eyeliner and even lipstick.

Wash Your Face
It’s a bit unsettling to think about all of the chemicals, dust and dirt that have made their way to your face throughout the day, so be sure that you wash your face before bed for cleaner, clearer skin. Start by washing your face with a gentle cleanser, then follow up with a toner with salicylic acid to clear up stubborn breakouts. Finish by moisturizing with a gentle facial lotion, in addition to a swipe of eye cream underneath your eyes.

Drink a Soothing Drink
Whether it’s a decaffeinated herbal tea or a cool glass of water, make sure that your body is hydrated. Try not to drink more than one cup of your evening beverage, since you don’t want to disturb your beauty sleep with a late night trip to the bathroom.

Unplug from Technology
It’s no mystery why it’s difficult to fall asleep immediately after logging off of Facebook or Instagram – the bright lights that your phone and laptop give off cause your brain to stay alert and awake. To help your mind unwind, step away from your favorite technology about 30 minutes prior to when you plan on heading to sleep.

Write Everything Down
If your to-do list for the next day seems endless, it will help to write down all of your responsibilities and commitments. Otherwise, you’ll lie down and only think about all of the things that you need to do the next day.

Talk with your Roommate(s)
Your roommate(s) may not be your best friend(s), but it’s always refreshing to take a few minutes at the end of the day to let each other know about what is going on in your lives.

Take a Few Moments of Silence
This practice is different for everyone. You may choose to simply take a few deep breaths, write in your journal or pray. The main objective is to enjoy your own company without relying on technology or friends to keep you entertained. The value of peace and quiet is underrated, so seek some space to quietly reflect on the day and prepare yourself for the next.

Remember that it takes at least 21 days to form a habit, so have no fear if you’re unable to complete all of these requirements every evening. Start slowly by incorporating one or two into your routine, then gradually add more in order to have the most restful night’s sleep possible.

By: Jen Morgan | Image: Source

From Runway to Real Life: Fall Hair Trends


Although fashion is usually at the forefront of attention during runway shows, the stunning hairstyles of the models are hard to miss. From voluminous waves to stick-straight ponies, hairstyles this season can be rocked with just about any texture. Say goodbye to summer beach waves and hello to these gorgeous new hair trends. Any of the models’ fall looks can be achieved by following a few simple steps.

Voluminous Waves
Big, textured curls are the perfect way to set off a boho-esque outfit. Good news, you won’t have to put much effort into these, because you won’t be using a curling iron. Instead, you can use foam rollers. Sleeping with the foam rollers in and taking them out in the morning yields the best results.

How to:
Divide your hair into three layers horizontally. Starting with the bottom one, roll medium-to-large sized foam rollers into hair and secure. Do the same with the middle and top layers. Once done, mist your hair with hairspray. After sleeping with the rollers in, take them out starting with the bottom layer and working your way to the top. Once finished, comb through curls with a wide toothed comb and spray generously with hairspray. For extra volume, tease hair at the roots.


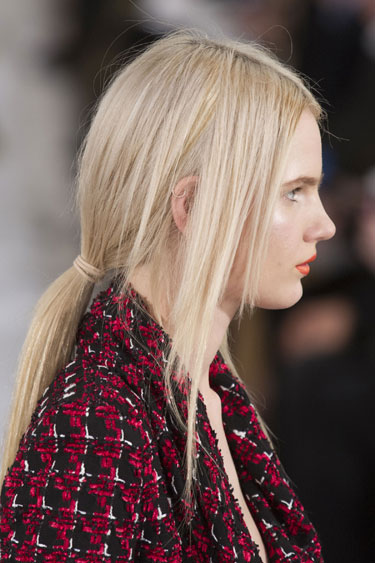
Low, Straight Pony
A low ponytail is an easy yet sophisticated way to style your hair. It’s also a great way to get your hair off the face and to show off scarves.

How to:
Gather the hair at the nape of the neck while keeping the part intact. Comb through to ensure there are no bumps or tangles, and secure with an elastic. For an edgier or more effortless look, pull pieces of hair out of the ponytail and frame your face.


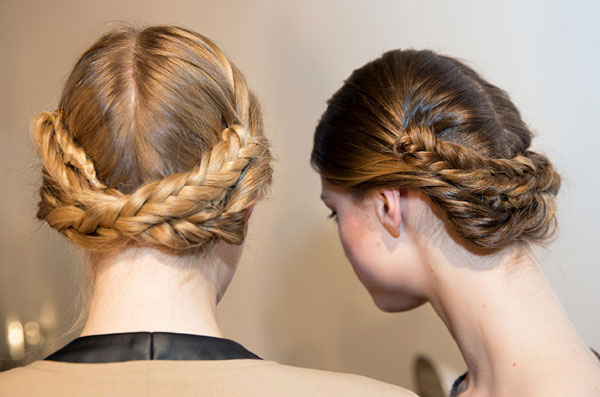
Braided Up-Do
Models have been spotted wearing all kinds of braided hairstyles, from French braids to fishtails to simple side braids. This season, a unique braided up-do style has become more and more popular on the runway. This hairstyle might look tricky, but it’s easier than you think. Be ready to receive compliments.

How to:
Part hair straight down the middle. Divide the hair into two pigtails. Starting at about two inches below the top of your head, begin to French braid both pigtails. When you are done, secure the ends with an elastic. Take one French braid and pull it horizontally across the back of your neck, and make sure that the underside of the braid is the one that is showing. Pull it tight enough so that it is not sagging, and tuck the end of the braid under the opposite French braid. Secure to head (about halfway up head) with bobby pins. Do the same for the other braid, making sure to secure it.

The start of a new season is the perfect opportunity to experiment with hairstyles. Don’t be afraid to try out daring styles, like huge curls. Never underestimate how sophisticated a simple ponytail can be, and embrace revamped versions of the classic braid. Wear your new hairstyle with pride because the world is your runway.

By: Chrissy Tansey | Images: 1, 2, 3

6 Popular Hair Myths, Debunked


It's easy to believe commercials that promise to restore your heat-damaged hair, and it's hard to ignore your mother's advice to brush your hair in the morning. But it turns out, all of these hair tips are nothing but myths! Learn why it's time to do what's best for you.

Trimming Your Hair Will Promote Growth
So let’s clear this up, hair grows from the roots not the ends. Now this doesn’t mean you should stop trimming your hair every two-to-three months; a trim will chop off split ends, therefore preventing breakage, which leads to longer and fuller hair.


Split Ends Can Be Repaired 
NOTHING will repair split ends. Products that claim to repair split ends are more like “hair makeup.” They seal the follicle for that moment, but that’s about it. 

Greasy Hair Can be Cured by Shampooing Less Often
Now, this is one we wished were true. The reality is that the amount of grease produced by your sebaceous glands is determined by genes, age and hormones. Wash your hair as often as you prefer. Stick to what works for you.

Switching Shampoos Prevents “Immunity”
Hair can’t tell the difference. Stick with what works according to your hair type.

Brushing Hair 100 Strokes Helps Shine
The people with the most beautiful hair don’t brush their hair. Yep, it’s true ladies! Brushing your hair does not stimulate hair growth or distribute your hair’s natural oils. This is the one time you shouldn’t listen to your granny! “In fact, brushing causes friction on hair, leading to cuticle damage and breakage, which makes hair lusterless and frizzy,” said Mirmirani to O Magazine. “Brush your hair minimally (only to detangle or style), and use the right tools—a wide-toothed comb or a paddle brush with ball-tipped, plastic bristles. Avoid boar-bristle brushes—natural bristles aren't uniform, so they're especially harsh on your hair and scalp.”

Avoid Conditioner If You Have Greasy Hair
This is a recipe for disaster. Conditioner hydrates your hair; you don’t want greasy roots and brittle ends. Apply conditioner from the ears down.

By: Ivanna Coello | Image: Source

The Best Makeup Looks to Match Your Favorite Movie Characters

Enjoying a movie is a timeless way to relax and spend time with friends. Many times, we can even relate to the characters and story lines of our favorite movie’s feature characters in terms of lifestyle, struggles and love interests.

When preparing for a themed movie party, many people will wear costumes or do their hair catered to their favorite character in order to show spirit and enthusiasm, but what about makeup? If you’re not sure where to begin, College Gloss has you covered with some beauty ideas for movies past and present.


Holly from "Breakfast at Tiffany’s" (1961)
In order to portray a makeup look worthy of elegant Audrey Hepburn status, go for a classic look such as a smokey eye. You can read “How to Create a Natural-Looking Smokey Eye” about how to master a natural smokey eye, or go all-out with a darker evening look using deeper shadows.


Cher from "Clueless" (1995)
A wealthy beauty queen and shopaholic, Miss Cher Horowitz settles for nothing less than glamorous. When it comes to her makeup, nothing is off limits because Cher loves experimenting with new looks for both her makeup and fashion routines. Basically any look can work to portray Cher, from bold and colorful shadow to classic red lips. Be creative because her options are limitless.


Ali Rose from "Burlesque" (2010)
Effortlessly beautiful, Ali must always look the part as she dances. The movie mentions that she taught herself how to apply makeup because her mother passed when she was young and, therefore, she was not able watch her mother practice her makeup growing up. Despite this, Ali still has a few tricks up her sleeve. To capture her persona, go for false eyelashes and bold winged liner.


Katniss from "The Hunger Games" and "Catching Fire" (2012, 2013)
Due to Katniss’s financial situation and limited amount of free time, she hadn’t been exposed to makeup until it was time for her to be presented as tribute for her district. Known as the “Girl on Fire,” you better believe that her makeup needs to match her unforgettable name. To portray this side of Katniss, go for a bold and colorful multi-dimensional look with lots of blending. To represent Katniss’s journey during the Hunger Games, experiment with earthy shadows such as brown and olive green, while keeping the rest of the look simple.


Aimee from "The Spectacular Now" (2013)
This summer coming-of-age film is about two seniors who become unlikely friends in the midst of some difficult trials. Because Aimee has a very shy and reserved personality, her makeup reflects that part of her accordingly. If you’re trying to mirror Aimee’s look, think back to the basics, such as black mascara, tinted moisturizer and a swipe of lip balm.

Whichever character you choose, you’ll surely look bold and beautiful if you follow our makeup suggestions.

(For more inspiration from Hollywood Stars, see “Your Signature Beauty Look: The Elizabeth” and “Your Signature Beauty Look: The Marilyn.”

By: Jen Morgan

10 Tips for Waking Up Gorgeous


Waking up looking beautiful can be a challenge when you’re running a tight shift. For independent, educated women, priorities often lie in books and work. But it’s important to take time from that packed schedule to pamper yourself. Not to worry though, it won’t take too much time. Make mornings less stressful by following these tips for preparing the night before.

1. Cleanse and Hydrate
This may be a “no brainer,” but here’s another reminder: take your makeup off and follow with your favorite moisturizer. Even if the day left you begging for bed, the extra few minutes are actually essential. This will help prevent breakouts, saving the time for extra makeup and treatments later these would require later. And don’t forget to use the most basic moisturizer, water, by drinking it throughout the day.

2. Try a Mask
Whether your skin needs hydration or a breakout is causing chaos, apply an overnight mask to repair your skin or some benzoyl peroxide to reduce the inflammation surrounding your blemishes.


3. Use an Overnight Hair Treatment
Waking up with gorgeous hair saves styling time and stress. Apply an overnight treatment for bouncier and shinier tresses. We are obsessed with L’oreal EverStrong Sulfate-Free Overnight Repair Treatment ($5.97, amazon.com).

4. Self Tan
Exfoliate your entire body and apply your favorite self tan. Let it dry before jumping into bed, so you can wake up looking effortlessly glowy mid-fall season! No need to apply and later reapply bronzer.


5. Let Hair Oils Do Their Magic
We love applying Josie Maran Pure Argan Oil To Go ($14, josiemarancosmetics.com) to our hair, cuticles, nails and just about anywhere that’s a little parched. If you are a running on a tight budget, opt for olive oil, as it also is effective.

(For more on hair oils, read The Best Oil Treatments for Healthier Hair.)

6. Treat Hands and Feet
There is nothing better than applying a thick cream to your hands and feet. You mustn't forget this part of your body because they show signs of aging the fastest.


7. Exfoliate and Moisturize Lips
You can make your own lip scrub from sugar or exfoliate with your toothbrush’s bristles. After exfoliating, apply your favorite lip balm. You will wake up with noticeably kissable lips. Treat yourself with Dior Crème de Rose Smoothing Plumping Lip Balm ($27, dior.com).

8. Sleep on Silk
This is one of the oldest beauty tips for a reason. Silk keeps wrinkles at bay and maintains proper moisture in your hair and skin. Since silk is resistant to dust mites, it keeps allergies away, which will prevent puffiness in the morning.

9. Sleep on Your Back
We know this one takes some getting used to, but sleeping on your back will prevent premature wrinkles. Our skin renews its cells during the nighttime, which is why we also recommended that you sleep on silk; don’t let those cotton lines on your face happen the next morning, they can become permanent wrinkles! Sleeping on your back also prevents morning puffiness. Lisa Okesson, national training manager for makeup company Shu Uemura USA, suggests this old Hollywood secret: “Sleep on your back and use a slightly elevated firm pillow to help prevent fluids from pooling in your facial tissues at night,” as stated on Real Beauty.


10. Protect the Blowout
Never, ever sleep on your loose mane! Tie your locks up in a high ponytail to protect your blowout and your skin from any impending breakouts! We hate elastic bands, so we suggest you invest in ribbon hair ties ($8.50, Sephora), which are far less damaging to your hair.

By: Ivanna Coello | Image: Source

The Best Oil Treatments for Healthier Hair

The use of natural oil to improve lackluster hair has recently skyrocketed. With so many different brands, varieties and results, it’s difficult to know which to try. College Gloss has compiled a short guide to help your decision go smoothly.

Argan Oil
Argan oil (Argania Spinosa Kernel Oil) has become one of the most popular hair oils on the market and has earned the nickname “liquid gold.” It is derived from the kernels of the argan tree, well known in Morocco. Its nutritive properties come from Omega 9, Oleic, Linoleic, Vitamin E and unsaturated fatty acids. Numerous drugstore hair brands have adopted their own unique spin on this best-selling hair oil. Typically amber in color, this oil is a great pre-blow dry treatment, as it helps to seal the hair cuticle while nourishing and providing a smooth texture. The oil also helps heat hair to cut blow dry time.

Try: Moroccan Sleek Oil Treatment by Garnier Fructis ($6)

Macadamia Oil 
Macadamia oil (Macadamia Ternifolia Seed Oil) is derived from macadamia nuts, which are native to Australia. Making its mark as a miracle oil more recently than argan oil, it’s another oil that has luscious restoring properties for your locks. It’s designed to smooth and shine while providing UV protection and reducing drying time.

The most recognized brand selling macadamia oil products is Macadamia Natural Oil, which comes in green and brown packaging. The Macadamia Natural Oil product line features a wide range of products from cleansing to conditioning to styling. The brand combines both macadamia oil and argan oil to make their products. The macadamia oil on its own is very lightweight, so by combining the oils, their power increases and positive results increase.

Try: Healing Oil Treatment by Macadamia Natural Oil ($13.50)

Coconut Oil
Coconut oil is known for being a multi-purpose essential. Besides being used for skin and hair care, it’s also used as a disease prevention and digestive aid, stress reducer and weight loss companion.

This hydrophobic oil repels water, which makes it a great pre-wash hair treatment because by preventing water from absorbing into each strand, the risk of damage or breakage is decreased. It is also known for decreasing dandruff, eliminating lice, fighting frizz, providing protein to the hair and encouraging regrowth for longer, stronger hair. The do-it-all product is often found in a solid state, rather than liquid, as that’s its natural from. It melts with the warmth of your hand at just over 70 degrees Fahrenheit. So simply rub a small portion of the solid formula in your hands, then smooth it into your hair. You can find it in the cooking aisle of your local or speciality grocery store. CostCo also has a large tub for a cheap way to stock this beauty product in your own bathroom.

Try: Organic Virgin Coconut Oil by Nutria ($14.95)

Diamond Oil
Best-selling, high-end hair care brand Redken released their oil combo powerhouse called Shatterproof Shine Diamond Oil earlier this year. The oil “utilizes an exclusive formula of silicone free hair oils that include camelina oil, coriander oil, apricot oil, olive oil, jojoba oil, coconut oil and others to strengthen hair from the inside-out,” according to Redken’s website. It’s unique due to the fact that it targets all layers of the hair for optimal protection and shine. It helps to protect hair from breakage while providing a light, intriguing scent.

Try: Diamond Oil Shatterproof Shine by Redken ($25)

Olive Oil
Although olive oil is not sold on its own as a hair care product, it is still worth mentioning. It’s one of nature’s top emollients that can penetrate the hair better than other oils, and it’s super moisturizing while also being lightweight.

It’s a great choice for girls with allergies, sensitive skin or a sensitive scalp because it’s not likely to cause an allergic reaction. Like coconut oil, olive oil prevents dandruff by promoting scalp health. It also contains Vitamin E, which acts as a powerful antioxidant for hair growth. If you’re not comfortable going for the pure oil itself, use a product that incorporates its sleek and shine benefits, such as Organic Root Stimulator's Olive Oil Moisturizing Hair Lotion ($5).

By using one of these oils on a regular basis, or even mixing it up by trying each of them, your hair is guaranteed to become healthier and more nourished. If you’re dealing with constant frizz and lack of shine and you have a bit of extra cash to spend, try argan oil, macadamia oil or diamond oil. If you simply want to moisturize and nourish your hair naturally, or if you’re on a tight budget, try olive oil or coconut oil.

By: Jen Morgan

Makeup Must-Haves for Every Look & Occasion


There are so many different makeup combinations and looks to try in the cosmetic world today. After all of the hype has passed for certain looks, there will still be a few essential products that will work well with every look. If you don’t own these versatile products already, we suggest that you give them a go.

Black Mascara

The look of long, fluttery eyelashes will always be flattering. Classic black mascara will work with every outfit and makeup look that you decide to try, as color mascara may not match with every shadow in your collection. Girls with blonde hair are often immensely thankful for the power that black mascara has since it makes eyelashes visible and helps them to look fierce with every application.


Full Coverage Foundation

When you apply foundation, your complexion is evened out while also concealing pimples and redness. Once you find the right shade of foundation for your skin tone, try to get into the habit of applying it every time you decide to use makeup. Foundation serves as a great base for a flawless overall look, so take the time to ensure that it’s applied correctly and evenly. A few tools of the trade for applying foundation are makeup sponges, whether contoured or rectangular, a specially designed brush or even your fingertips. Test out each of these to see what works best for your routine.


Clear Lip Gloss

A tube of clear lip gloss is similar to a pair of nude heels in the fashion world – anything paired with it will look amazing. If your eye look is intense and you don’t want your lips to steal the show, swipe on some clear gloss to keep your lips shiny and moisturized without the pop of color. The clear gloss also works well for days that you’re in a rush or have an early class with limited time to get ready for your day. Since it’s quick and easy to apply without a mirror, you can take it with you on the run so that you’re able to put some effort into your look without wasting precious time.

Our pick: NYX Sheer Gloss 

Bronzer

Even though summer has come to an end, using bronzer all year round is still acceptable; its purpose just changes. In the summertime, bronzer is used to amplify your tan, while in the cooler seasons it’s used to help to warm up your complexion, as your skin gets lighter from minimal sun exposure in the fall and winter. To update your bronzer for the fall, opt for a large, fluffy powder brush rather than a contoured angle brush so that once it’s applied it looks natural instead of forced. When choosing a bronzer to use, look for one with a matte finish instead of a shimmery one to keep from giving off that summertime vibe.

Blush

Rosy, vibrant cheeks make everyone look a little brighter. After you use your bronzer, dust on a peach or coral shade to the apples of your cheeks to complement the bronzer and help your complexion look vibrant and young.

The next time you apply your makeup, whether it’s for class or a party, going back to the basics will help you to look flawless and radiant. What are your makeup must-haves?

By: Jen Morgan | Image: Source
 
Back To Top
Copyright © 2014 College Gloss. OddThemes